Assessing the sink and plumbing determines the right disposal model. Gather tools, parts, and safety gear before starting. The installation proceeds with a clean, level sink flange, secure mounting, and proper piping connections. Electrical connections must meet code, and a leak test should follow. Run cold water to observe operation and listen for unusual noises. If problems arise, maintenance steps and troubleshooting tips will help, and a careful check of seals and jams will be needed before completing the setup.
Assess Your Need and Choose the Right Disposal
Assessing need begins with evaluating kitchen habits and existing plumbing.
The section outlines practical criteria, guiding readers to determine whether a disposal is appropriate.
It presents concise steps: assess load, waste types, and disposal compatibility.
Consider Topic ideas and Professional considerations when selecting models, capacities, and warranties.
The aim is clear choice, freedom to tailor installation to real household patterns and plumbing constraints.
Gather Tools, Parts, and Safety Gear
Before starting, gather all necessary tools, parts, and safety gear in one place to ensure a smooth installation.
Assemble basic items: screwdriver, adjustable wrench, pliers, bucket, plumber’s putty, silicone sealant, electrical tester, and mounting hardware.
Check tool compatibility with the disposal model.
Note safety gear requirements: eye protection, gloves, and hearing protection; keep hands dry and electricity off when handling connections.
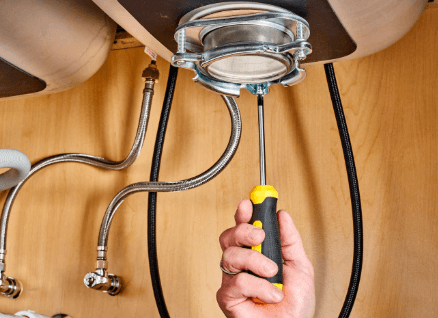
Step-by-Step Installation Process
The installer begins by mounting the disposal unit according to the selected model, ensuring the sink flange is clean and level.
Next, connect the discharge pipe and supply lines, tighten mounts, and secure the electrical connection per code.
Verify unit alignment, perform a quick leak check, and test operation.
disposal sizing is considered, and brand comparison informs mounting hardware choices.
Test, Troubleshoot, and Maintain Your Disposal
To ensure reliable operation, begin by performing a quick functional test after installation: run cold water, start the disposal, and verify it runs smoothly without unusual noises or vibrations.
Then identify clogs, jam hazards, and reset procedures.
Regular maintenance includes grinding small batches, cleaning with lemon, and inspecting seals.
Avoid irrelevant debate and unrelated considerations to preserve efficiency and safety.
See also: Space Technology Benefits on Earth
Conclusion
A workforce-wide habit shift followed the first disposal install: a homeowner who once dumped scraps into a sink now starts every morning with a quick check of the switch, hose, and seal. In one week, the kitchen stayed cleaner, and the drain clog rate dropped to near zero—like clockwork data in a well-tuned machine. The practical, step-by-step process proved itself by turning guesswork into reliable routine: install, test, maintain, and reuse.